Tuesday, February 26, 2019
Tuesday, February 19, 2019
Meet the Clutter Scale: One Pro's Secret to a More Intentional Home
Although I have always been organized, there were two significant moments in my life that taught me how to manage clutter.
The first was when I returned from a backpacking trip around the world. Having visited homes in many developing nations, I no longer wanted to have such excess in my own home. My possessions were organized, but I had too many of them for my taste.
After I unpacked from my journey, I began a thorough review of my stuff. I started upstairs, removing unnecessary items floor by floor. By the time I reached the basement, I had enough stuff to set up a second apartment.
My second decluttering lesson was right after my divorce. Just months after the split, I was facing bankruptcy. I began my climb out of sudden and severe financial debt while simultaneously making a name for myself in the organizing industry. I hired a top-tier PR agent, but I knew I had to come up with some big bucks to cover his fee and all the expenses that go along with creating a brand. I decided to sell my home and everything I owned to make it happen.
As I sorted my belongings for a second time, I created the ranking system below to help me decide what to keep and what to toss. It worked beautifully for me, and I think it can work for you too.
The clutter scale
5 - Important items whose place in your home is non-negotiable. For me, this included my green-stained Depression glass, photos, business files, office equipment and car.
4 - Items that are difficult to replace and items you use every day. This pile included most of my clothes, some furniture, a favorite sheet set, towels and jewelry.
3 - Items you use occasionally but haven’t used within the last six months.
2 - Items you rarely use but feel hesitant to toss.
1 - Items you never use, like seasonal items, specialized tools or kitchen gadgets. I got rid of stationery, extra wrapping paper, old boxes and my printer.
You know what I found as I used the clutter scale? There were rarely items that rated a 2 or 3. And once I established some criteria, I sorted and purged the 2s and 3s like never before. As you sort your less important items, ask yourself the following questions:
- Do I love it?
- What's the special story behind it?
- Do I have the space for it?
- Can I replace it?
- Can I easily borrow it or rent it if I need it again?
- Does it support my goals and values?
- Does it compare to the items I ranked as a 5?
The clutter scale is a great way to get back in touch with your priorities. My priority at the time was starting my business, so I kept the bigger goal in sight and let go of anything that didn’t support it.
What I didn't know then was that I was already practicing what I was going to preach in my business. I learned to organize my life and stuff based on my values. I chose to collect experiences - not things.
As you declutter and rank your possessions, don’t forget to take a few minutes to think about your goals and values. You’ll find your home to be much more intentional and peaceful if you do!
Related:
- 5 Organizing Secrets Only the Pros Know
- 3 Steps to Creating an Organized Entryway (Even If You Don’t Have the Space)
- 10 Home Organization Woes (and How to Fix Them)
Originally published January 2017.
via Zillow Porchlight http://bit.ly/2E06TLY
With This DIY Sporting Goods Catch-All, Game Day Is No Sweat
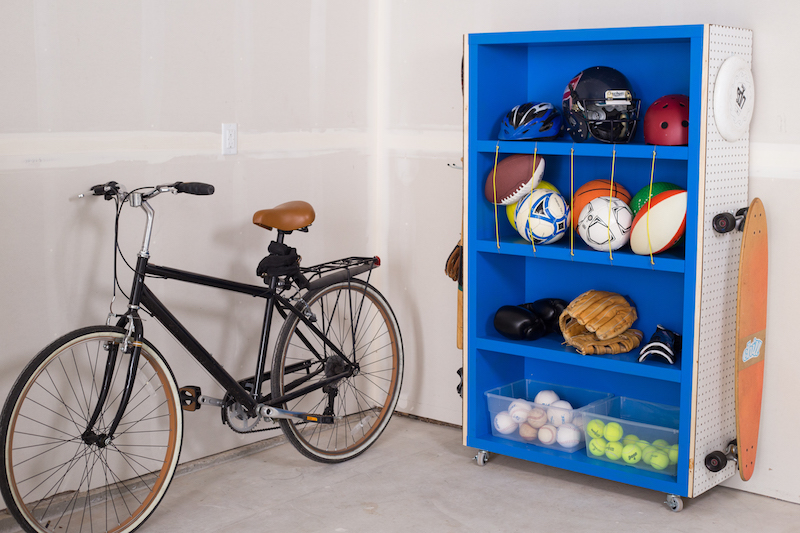
This project will help you organize your garage and become the MVP of DIY projects. With all your sporting gear in the same place, you’ll always be prepared when someone yells, "Where’s my basketball?” (Or volleyball, hockey stick, tennis racket, etc.)
See how it’s done, then follow the step-by-step instructions to build one of your own.
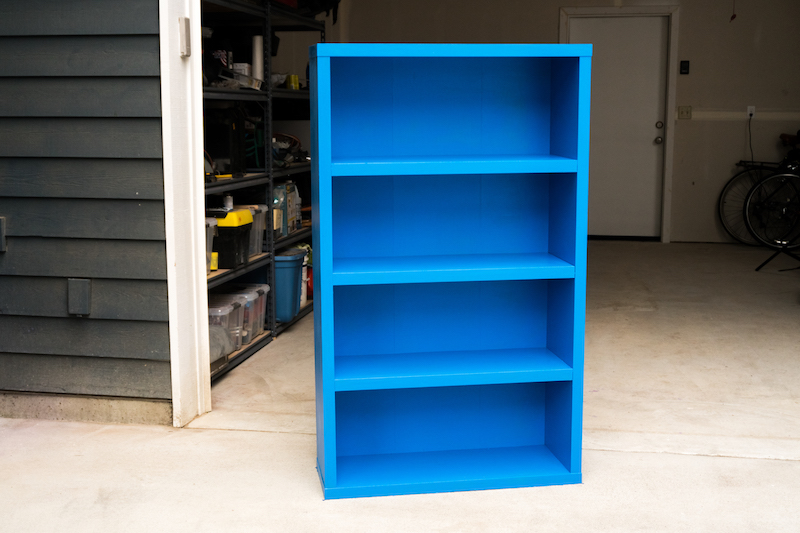
1. Find a bookcase
Choose a bookcase with at least three wide shelves so you can store gear in a variety of sizes.
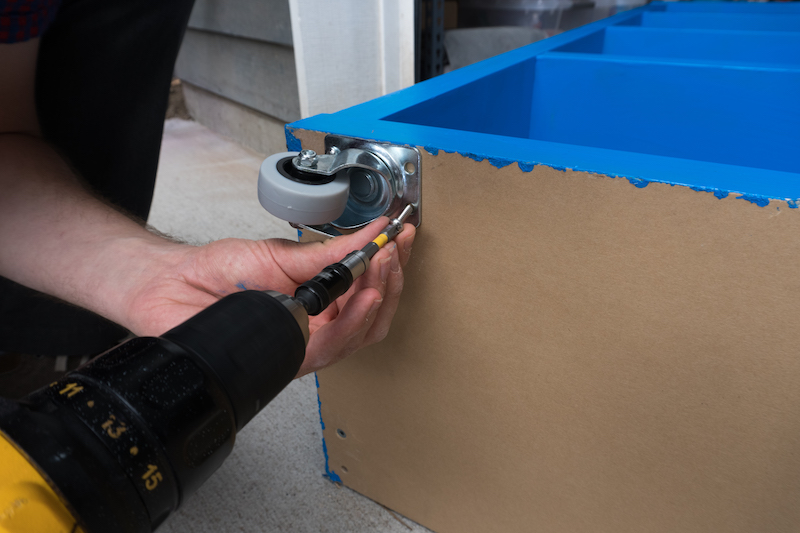
2. Add locking wheels
Attach locking wheels to the bottom of the bookcase so you can easily move it around the mudroom or the garage.
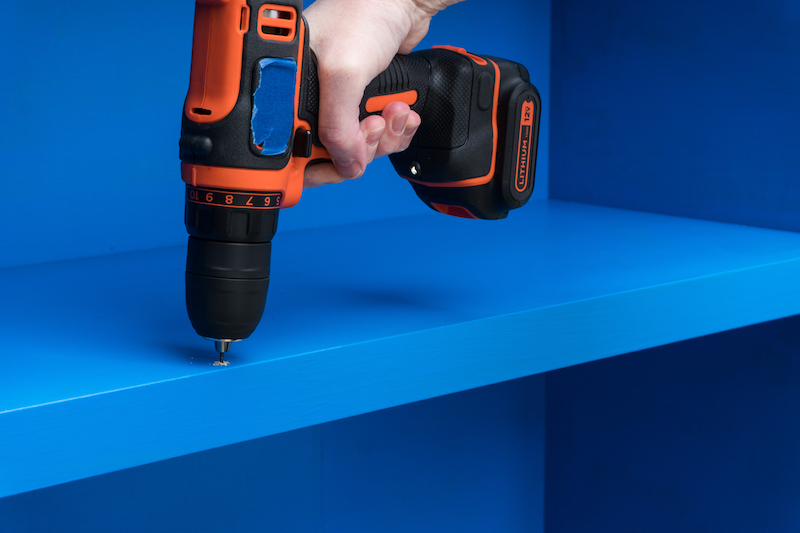
3. Drill holes
Drill evenly spaced holes (about four or five, depending on the width of the bookcase) along the top surface of one of the shelves. Keep the holes fairly close to the edge - about one-half inch away or less.
On the underside of the shelf below, drill holes to match up exactly with the holes on the shelf above.
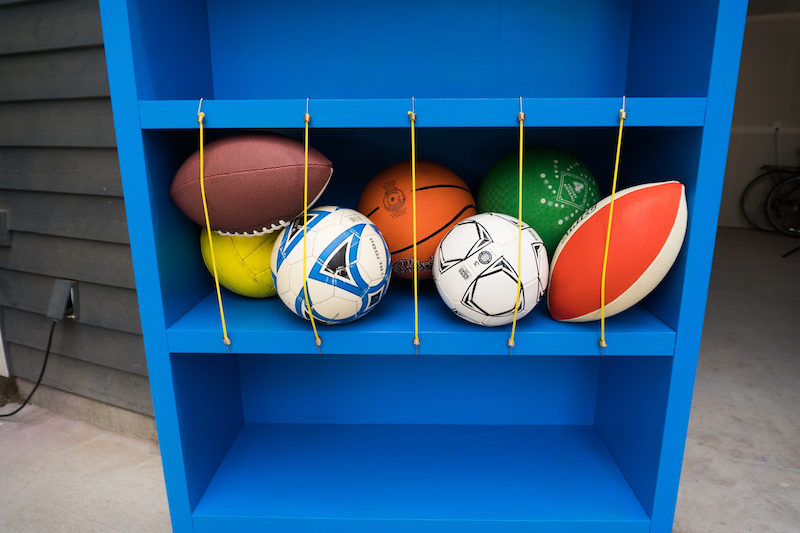
4. Attach bungee cords
Place the bungee cord hooks in the drilled holes, and arrange the cords vertically so they create a net. You want the cords to be pretty taut, so get the right size for your bookcase.
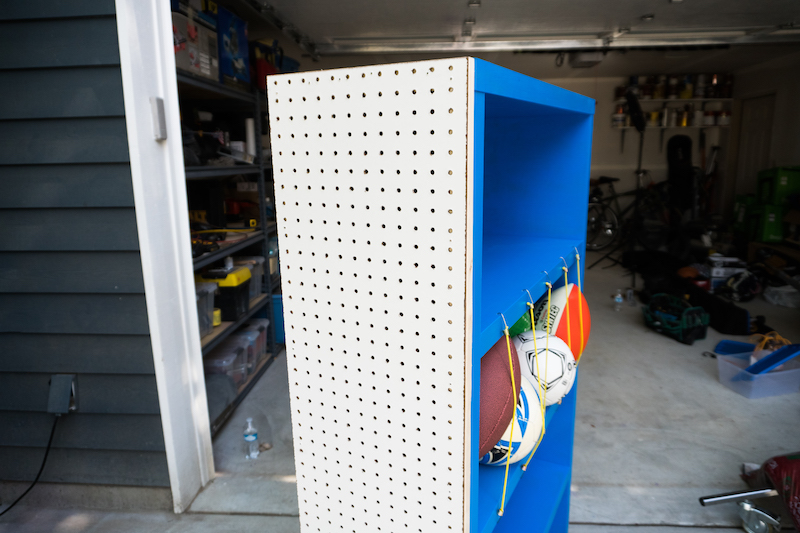
5. Mount peg boards
Frame the sides of your bookcase with 1-by-2-inch boards to support peg boards that have been cut to size. Secure the peg boards with a few nails on the top and bottom.
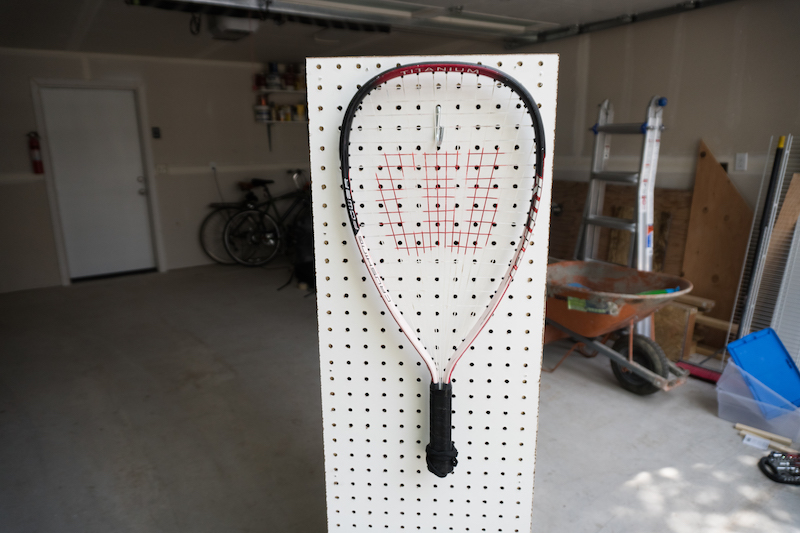
6. Customize with hooks and holders
Place hooks and holders on the peg board so you can hang your tennis rackets, baseball gloves, jerseys, helmets and more.
7. Load up your catch-all, MVP!
Grab your gear and organize the bins however you see fit. Now all you have to worry about is scoring the winning goal.
Related:
- A DIY for the Books: How to Get Custom Built-In Shelves on a Budget
- A Quick DIY for Space-Saving Kids’ Room Storage
- DIY Backyard Fire Pit: Build It in Just 7 Easy Steps
Originally published September 2017.
via Zillow Porchlight http://bit.ly/2jlqnmZ
Friday, February 15, 2019
Thursday, February 14, 2019
8 Curb Appeal Boosters You Can Do in a Weekend
A polished home exterior creates an inviting experience for visitors or passersby, which is especially important if your home is on the market.
Check out our tips to get the most curb appeal for the lowest cost - while turning your neighbors' heads and getting prospective buyers to your door.
Clean up
The easiest way to enhance curb appeal is dedicating a weekend to deep cleaning your home’s exterior.
Sure, you'll want to trim bushes, sweep and mow your lawn, but there's more to curb appeal than keeping a tidy front yard. Turn the nozzle on your garden hose to the strongest setting and clean off your driveway, sidewalk, windows and fence.
If dirt and grime are caked on your home's exterior, you can rent a powerwasher for around $50 to $75 a day. Just avoid areas with caulking, like windows and doors, because you can strip some of the sealing. And as tempting as it may be to powerwash your roof, don’t do it - you may damage the shingles’ coating.
When it comes to your windows, spraying them with a garden hose isn't enough. For maximum sparkle, clean your windows outside and inside. Instead of relying on a glass cleaner, try a mix of detergent diluted in warm water.
Add shutters
Shutters are an easy way to accentuate the size of your windows. They make your windows look larger and add visual interest by disrupting a bland exterior wall. For maximum curb appeal, choose a shutter color that contrasts with your home’s color to make it pop.
Paint accent areas
Paint is a quick and easy curb appeal booster. Instead of painting the entire exterior of your home, focus on the trim, door and shutters.
You can typically find a gallon of exterior paint for $20 to $30. But before you decide on a color, consider home exterior color trends, along with your home's natural style.
Give your door a face lift
If you don’t love your front door, you don't need to dish out loads of money to replace it. Think beyond paint - consider adding molding, which offers a decorative frame for your door that welcomes visitors.
You can also add metal house numbers, which you can find for as low as $5 a number. And if seasonally appropriate, consider adding a wreath to your door as a bonus.
Replace your house numbers
If you'd rather not add house numbers to your freshly painted door, here are some alternative DIY ideas:
- Paint a terra-cotta planter with your house number and place it by your doorstep.
- Add house numbers to a post planter near your front porch.
- Use your front porch stair riser’s real estate by hanging or painting numbers there.
Update your light fixtures
Replacing your exterior light fixtures is another curb appeal must. You can usually find outdoor sconces for around $20 at home centers. Just make sure your new light fixtures have the same mounting system. And if you want to save on lighting, a fresh finish can do wonders. Try spray-painting them - a can of spray paint costs around $10.
Keep porch furniture neutral
Just as you would aim to simplify the interior of your home so shoppers can envision themselves living there, the exterior of your home should be neutral and welcoming too.
Put your pink flamingo and wind chime collection into storage, and focus on porch decor that offers pops of color and character. You can find brightly colored outdoor chairs or throw pillows for $20 to $30 each.
Don’t forget the small things
These low-budget fixes make a big impact, so don’t forget the little details!
- Upgrade your mailbox: Install a new mailbox for under $100, or spray paint your existing mailbox.
- Plant a tree: A charming tree can up your curb appeal for as low as $20.
- Build a tree bench: If you already have a tree you love, build a bench around it! Great for napping, picnicking or just hiding exposed roots, a wraparound tree bench costs only what you spend on boards and screws.
- Install flower boxes: For around $20 each, flower boxes are a quick way to add some life and color to your windows. If flower boxes sound like too much work, try a container garden in pots by your front porch.
- Hide eyesores: Place a small lattice fence or a side of paneling around your air conditioner, and hide your trash bins behind a small fence. You can also hide your hose in a pot or storage bench.
Related:
- 5 Myths (and 5 Truths) About Selling Your Home
- Property Descriptions 101: How to Write Listing Descriptions That Sell
- 3 Must-Do’s Before Listing Your House for Sale
Originally published March 2018.
via Zillow Porchlight http://bit.ly/2IdGJun
Monday, February 4, 2019
3 Must-Do's Before Listing Your House for Sale
Planning to sell your house this year? Now’s the perfect time to prep it for listing!
Set aside a couple of weekends to do the work, and follow these three steps. Then, get ready to make a great impression on potential buyers and cinch the deal.
Step 1: Clean and declutter
It may sound obvious, but the importance of cleaning and decluttering cannot be overstated. Here are some ideas to make this process nearly painless.
- Eliminate clutter before cleaning. This is the time to purge your house of unwanted and unnecessary items. In addition to donating items to charity, consider giving them away through Craigslist or neighborhood sharing groups. Recyclers are often willing to pick up and haul away large metal items for free.
- Deep clean your house. This step will probably involve the biggest time investment. Get the whole family involved if you can! Think of this as a pumped-up spring cleaning. Pay special attention to kitchens and bathrooms, and clean the inside and outside of your windows - this makes a striking improvement in the overall appearance of your house.
- Organize closets, cabinets and drawers. In this case, out of sight is not out of mind. Many potential buyers will open cabinets and closets, because they are thinking about storage space. Clean and organized storage areas signal to buyers that you take care of the house.
Step 2: Make small repairs
Take care of these problems before you show the house for the first time. These are all fixes that you can do yourself.
- Fix any leaking faucets and running toilets.
- Replace caulking around tubs, showers and sinks.
- Freshen up or repair grout as needed.
- Repair walls and repaint them in a neutral, generally pleasing color that complements your home.
- Fix cracked or broken windows.
- Replace or repair damaged window screens.
- Replace burned-out lightbulbs.
Step 3: Go for curb appeal
You want potential buyers to be charmed by the outside of your house so they look forward to coming inside. Extend your pumped-up spring cleaning to the outside of your house too.
- Trim bushes, shrubs and trees. Make sure vegetation isn’t touching your roof or siding.
- Repair broken downspouts and gutters.
- If it's appropriate for your yard, apply new mulch, river rock and/or pea gravel. This can do wonders for your landscaping and provide immediate curb appeal.
- Clean and repair concrete areas, such as driveways and walkways. Eliminate any oil or grease stains, and clean out any weeds coming up through the cracks.
- If it's seasonally appropriate, put out some pots of annuals, which will maintain their color for the season. Freshen up your doorstep with a new welcome mat and make sure the house numbers are easy to see.
With just a moderate amount of effort, you can make your house beautiful and welcoming, both inside and out.
Ready to put your home on the market? Check out our Home Sellers Guide for more tips and resources.
Related:
- Don’t Believe These 5 Myths About Real Estate Agents
- 5 Myths (and 5 Truths) About Selling Your Home
- When Selling a Home, the Neighbors Matter
Originally published March 2017.
via Zillow Porchlight http://bit.ly/2n4DzxJ